OMiLAB
Wilfrid Utz
Type: software-download
TRL: 4-6
The FAIRWork Innovation Shop is an online platform, where the partners of the FAIRWork project upload there achievements in the form of self-contained innovation items, meaning that they can be understood and used without the need for a broad knowledge of the FAIRWork project.
In this context, this innovation item contains a modelling tool for creating the innovation items in the innovation shop. It supports the operators of an innovation shop in creating and changing innovation items and get an overview over them. In the modelling tool the information needed to create the innovation items can be saved and then automatically added. The modelling tool can be used to create the items manually or import them from a table structure, for example created through Microsoft Excel.
To use the modelling tool together with the innovation shop, the innovation shop must be set-up according to the description in https://innovationshop.fairwork-project.eu/items/17/.
The modelling tool, is based on the modelling tool created within the Change2Twin EU-funded project.
Contact Person
Information
The Innovation Shop Modelling tool offers a diagrammatic and conceptual modelling tool to define the Innovation Items that should be offered over the separate installed Innovation Shop. This tool supports provider of an innovation shop, by defining and adapting the innovation items. Additionally, an overview of the items can be created to allow quick insight in what which items are currently available on the innovation shop.
The modelling tool provides a graphical interface for adapting the items in a innovation shop. It was created in the context of the FAIRWork EU-funded project, to manage the FAIRWork Innovation Shop. The fundamental technology creates static webpages out of MarkDown files. To ease the creation of these files, especially in combination of the folder structure needed, the modelling tool allows to define needed information. This can also be used by provides with limited knowledge in website implementation. Once all the information is created in the model, all the MarkDown files and the folder structure can be automatically created.
An example of the interface can be seen in the picture below:
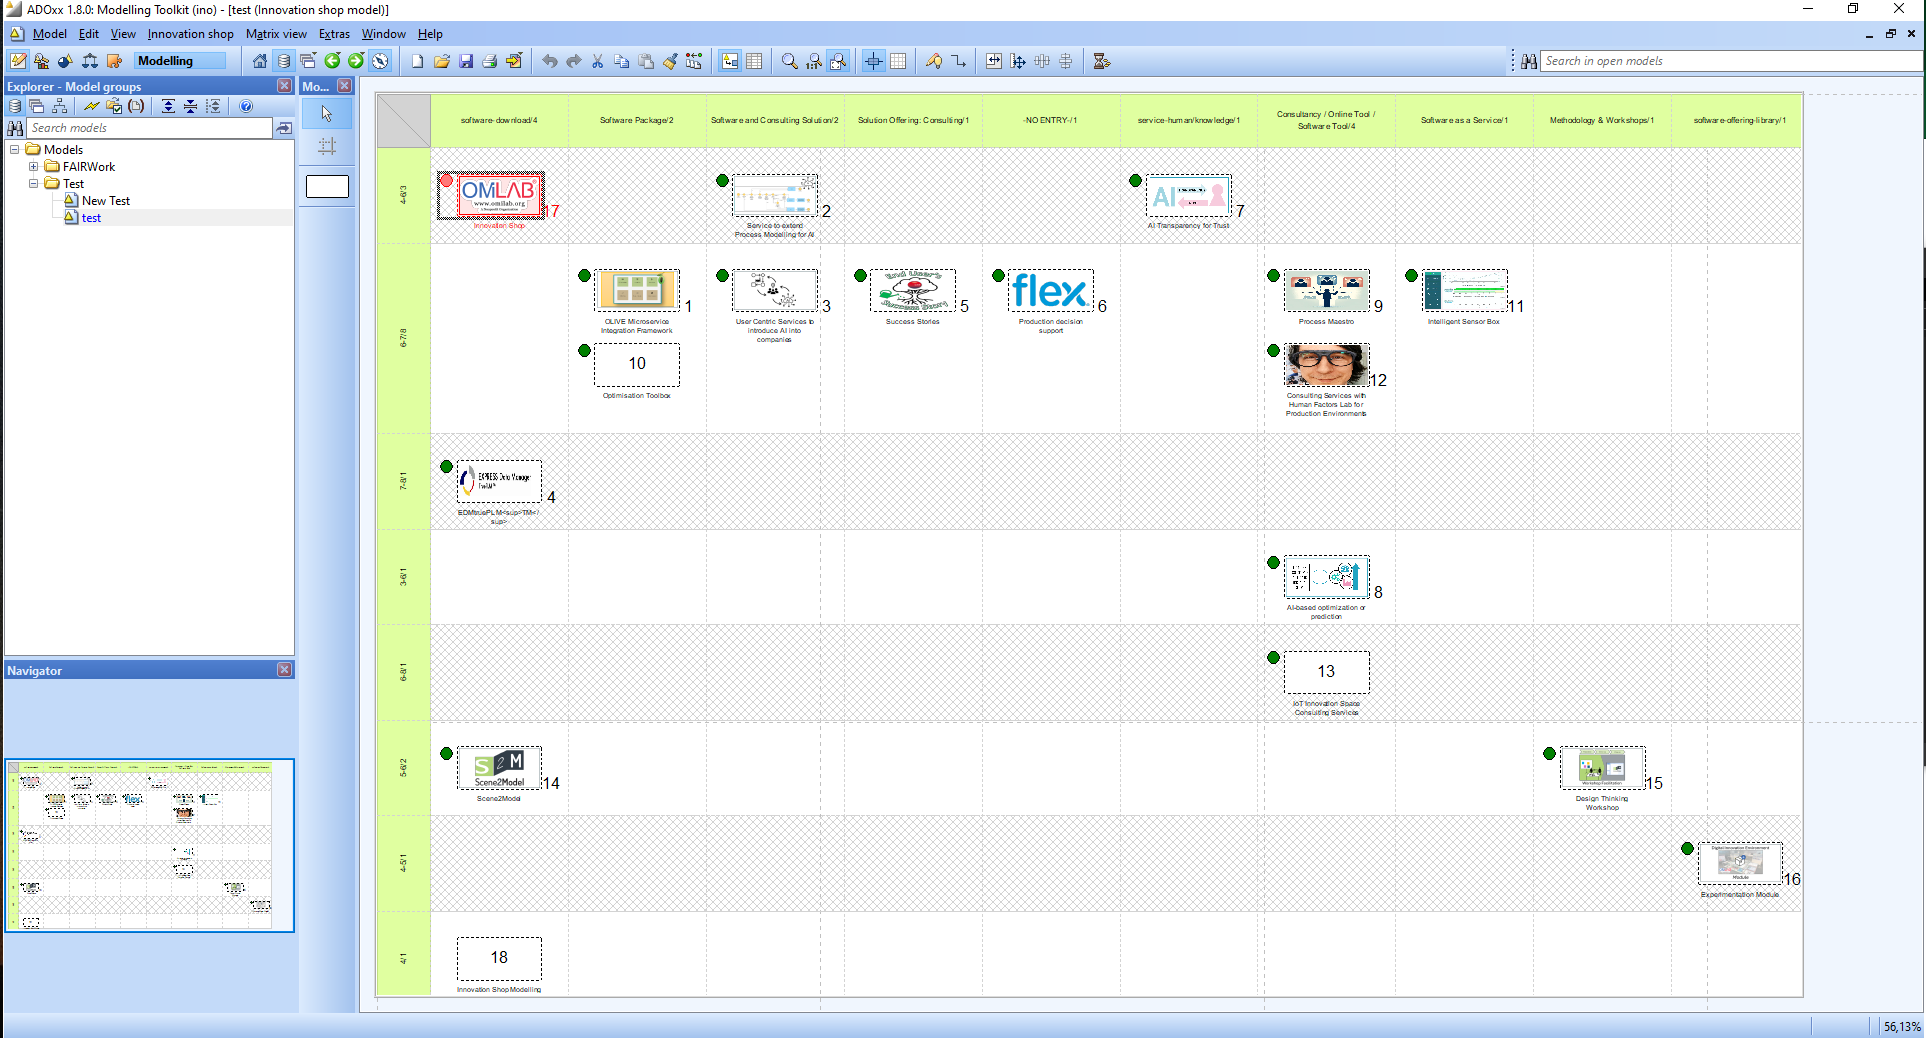
The core concept of the modelling tool is called Innovation item, which represents an item with all the information, that should or is available in the linked innovation shop. The model as a whole shows a matrix with two parameters, used to group the innovation items together. Each item is represented through a rectangle, its ID and a logo if available.
The information needed to create the items in the innovation shop can be added as the attributes of the item. These can be adapted by opening the notebook or switching to the table view of the model (information on how to do this can be found in the Use section). The attributes that are available in the modelling tool, are based on the information needed for the FAIRWork innovation shop.
The following information can be added to the innovation item objects:
- Item ID: The of the item in the innovation shop. For example, a number can be used.
- Owner: Name of the organisation which is responsible for the item.
- Owner Homepage: Link to the homepage of the owner.
- Name: Name of the innovation item, that is shown in the item overview of the innovation shop
- Longtitle: Long title of the innovation item, that is shown on the item’s page.
- Abstract (optional): A short description of the item, which is shown at the item overview.
- Description (optional): Introduction to the item, which is shown on the top of the item’s page.
- TRL: The Technology Readiness Level of the item.
- License (optional): The license under which the item is available.
- Contact person: A concrete person from the owner, which can be contact regarding the innovation item.
- Contact person (email): The E-mail address of the contact person.
- Contact point: This attribute can be used to provide an additional point of contact for the item. This is only used for items with TRL 9 or higher.
- Access credentials: Additional information about credentials regarding the item can be provided. This is only used for items with TRL 9 or higher.
- Logo (optional): A path to the logo (in a picture format) of the innovation item.
- Logo Owner (optional): Logo of the owner organisation, can be provided as path to local picture or as a URL.
- Solution type: An enumeration field where a solution type can be chosen. The solution types are pre-defined and based on the needs from the FAIRWork project.
- Information (optional): Text providing general information about the item, which will be shown under the Information heading of the item’s page.
- Use (optional): Text explaining how the item can be used, which will be shown under the Use heading of the item’s page.
- Extend (optional): Text providing information on how the item can be extended by its users. The text is shown under the Extend heading of the item’s page.
- Attached files (optional): Table where additional files can be defined, which are added to the innovation shop. More details will be provided below.
- Status: The status of the item in the context of the innovation shop. The values are explained in the Use section.
- Show status: If ticked a coloured circle is shown next to the item, indicating it status.
The table under the attribute Attached files can be used to add pictures to the description or add additional MarkDown files, which are added at the bottom of the description. Depending on what should be added different columns are needed. For adding MarkDown files at the end, the columns Order and Path are needed. For adding files, that should be referenced in the text, the columns Matching name, Picture name and Path are needed.
The columns have the following usage:
- Order: Defines the order in which the additional MarkDown files are shown at the end of the item’s page.
- Denomination: A string describing the items, to let other user of the models easily understand for what it is used. This has no effect on the item in the innovation shop.
- Matching name: A string that can be defined and used in the textual attributes of the innovation shop. The file defined in the path, will be copied to the innovation shop. The matching name will be replaced in all textual attributes, with the path to the copied file, so that the item’s page can show the linked file (e.g., a picture):
- Picture name: If this is defined, then the picture name (including the file extension) of the picture will be used to name the copied into the innovation shop.
- Path: The path to the file, that should be saved to the innovation shop. If matching name and picture name are defined, then the file will be saved under the item’s images. If only the order is defined, then it is saved in the content folder of item.
The modelling tool itself can be installed and used on its own, but creates more value if it is used together with the Innovation Shop, as described in the FAIRWork Innovation Shop item:
The modelling tool is a stand-alone tool that can be installed on Windows, Mac OS and Linux.
Use
To use the modelling tool to create innovation items, first the innovation shop must be set up, as described in https://innovationshop.fairwork-project.eu/items/17/. Then the modelling tool must be installed, which can be down here:
- Download modelling tool:
- Windows: Download Windows Installer
- Mac OS: Download MacOS Installer
- Linux: Download Linux Installer
- ADOxx Library: Download ADOxx Library
The modelling tool can be installed in a stand-alone fashion, on Windows, Mac and Linux. Information for the installation can be found in the download folder.
The deploying of the modelled innovation items is done via a local installation of the innovation shop, where the needed files are created and saved in this local installation. Afterwards, the created items are pushed to a public repository where the Innovation Shop is build and published. But for the modelling tool it is only important that the local project is available and that the needed files can be created in the folder.
Manual Creation of Innovation Items
To create innovation item manually with the modelling tool, the modelling tool must be opened and afterwards a model must be created:
- Click
Model - Click
New - In the opened window:
- Select
Innovation shop model - Enter a
Name - Select a
Model group
- Select
- A new model should be shown
- Click on the
Innovation itemin the modelling bar and create a new object in the model - with a double click on the new item to open the notebook and fill in all the information
- repeat till all innovation items are available
- Click on the
Import Items from Spreadsheet Editor
Another way to create or change innovation items with the modelling tool is to collect the information in a Spreadsheet Editor and then import the information into the modelling tool. The description in this section was tested with Microsoft Excel.
This functionality uses the table view of the modelling tool. To activate this view, you have to open the model and click on the Table button.

The spreadsheet must have the same order of columns as in the table view of the model. You can create a new object in the table view by:
right-clickon the table- click
Create new object
To add/change the information, copy the cells or lines in the spreadsheet editor. Then go to the modelling tool, mark the cell which should be changed and past the content. The marked and the following cells are overwritten, depending on how much cells were marked to copy in the spreadsheet editor. For enumeration attributes (e.g., Solution type) only the pre-defined values can be pasted. Tables, like used for the attached files, cannot be copied from the spreadsheet editor. But the content of the table cannot be overwritten by pasting.
Attention: If an error like Not all values could be pasted successfully or No values could be pasted!, this can be that you want to paste a value into an enumeration attributes, which is not allowed or that you want to overwrite a table attribute.
Tables can be changed by switching in the Graphic view and then open the notebook of the item.
Deploy Innovation Items
If an Innovation item should be exported to the innovation shop, the Status (in the notebook) must be set to Ready for deployment. This status must always be set manually and if after it is deployed the status stays on Ready for deployment until it is manually set. If a item is deployed which already exist, then it is overwritten. To get an easier overview on the statuses of the items, one can use Innovation shop –> Toggle status. This either shows or hides small circles next to the innovation item to show the status:
- white: Initial
- red: Draft
- orange: Ready for deployment
- green: Deployed
- gray: Decomissioned
To deploy the items through the modelling tool:
- All items with the status Ready for deployment will be deployed
- Click
Innovation shop - Click
Deploy innovation items - Search for the folder with the local Git repository
- If no error is shown, then the items are deployed locally
To make the items publicly available the changes must be pushed to Git repository where it is automatically build an published. To do so, open the terminal in the local folder of the innovation shop and enter the following commands, assuming that all made changes should be made publicly available:
git add *git commit -m "add/change item X and Y"(the text between the quotation marks should ba adapted to fit the the made changes)git push
Create Item Overview
The items can be positioned along different dimensions on the drawing area (in the Graphic view). Thereby, a matrix is generated with two different dimensions, used to group the items. The positioning can be done modelling tool. Thereby, it can be triggered manually or automatically.
The arrangement of a individual object is triggered, if an attribute used for the arrangement of the objects.
Manually it can be triggered over the menubar by using the submenus of Matrix view. To arrange the items, first the two dimensions must be defined, then the matrix must be prepared and last but not least, the innovation items must be arranged positioned in their space in the matrix. For each step a functionality is available, which can be triggered manually:
Matrix view–>0. Define dimensions (vertical/horizontal): Choose the two dimensions for the matrix view. Enter the attribute of the item in the corresponding opening text fields.Matrix view–>1. Retrieve all possible dimensions: Creates the matrix on which the items are positioned. Therefore, all possible columns and rows are identified from the available elements. Additionally, the width/height of each column/row is defined by counting the items that belong in one intersection.Matrix view–>2. Position items in dimensions: The innovation object in the model are positioned in the corresponding intersection of the two dimensions.
Adapt Item Status
The status of an item influences if it is deployed to the Innovation shop or not. The individual status of an item can be changed in the notebook, as well as if the status of the item should be shown in the model.
To influence the status and its visualisation together, two functionalities are offered:
Innovation shop–>Toggle status: Change the status of all innovation itemsInnovation shop–>Set selected statuses: Set the status of all selected innovation items. First select all the innovation items, for which the status should be changed, by marking them. Then the functionality must be triggered.
Extend
The modelling tool was created with the ADOxx metamodelling platform, which can be used to extend the modelling tool. For extending the modelling tool, knowledge in ADOxx, the innovation shop and software engineering in general is needed.
To extend the modelling tool, first the ADOxx metamodelling platform must be installed. Then the ABL file of the modelling tool can be downloaded on this page and imported into ADOxx, where additional functionality can be implemented.