OMiLAB
Wilfrid Utz
Type: software-download
TRL: 7
The Innovation Shop Portal hosts key facts and description of research and innovation results from the project, as well as, eventually description and reference to the source of generic and re-useable functional parts. It provides additional descriptions and demonstration samples, to communicate the innovations with potential users, to enable the re-use of the results by developers that do not know the context of the project.
Therefore, innovation items should be self-contained, so that they can be used and understood on its own. This enables users to easier understand and use the item.
Contact Person
Information
This innovation item describes the FAIRWork Innovation Shop, with a focus on the technical architecture and insights on how it can be adapted to other project. Therefore, the description does not focus on providing organisational information, like how it is used in FAIRWork’s exploitation strategy. This information is handled in another task within the project and not accessible to the public.
The goal of the innovation shop is to provide a platform, where the project partners can publish artefacts created in the context of FAIRWork. These artefacts can be on any Technology Readiness Level (TRL), ranging from early prototypes to well-tested products. For the project, this allows to publish results quicker and the partners to use them.
The basic idea of the FAIRWork Innovation Shop is based on marketed places or innovation shops used in other EU-funded projects, like:
- Change2Twin: https://marketplace.change2twin.eu/
- CloudSocket: https://site.cloudsocket.eu/cloudsocket-innovation-shop
The FAIRWork Innovation Shop is based on the technology of the Change2Twin Marketplace. In contrast to the FAIRWork Innovation Shop, has the Change2Twin Marketplace additional goals, like allowing people external to the project to provide their products/items over the platform. Additionally, the marketplace supports organisations who want to use the offered technologies to assess their needs and find fitting solutions. Therefore, it focuses more on bringing providers and consumers of solutions together.
The FAIRWork innovation shop focuses on disseminating all kind of artefacts created in the context of the project. Therefore, only contributions of project partners are offered on the platform. But each item posses a contact information, so that interested persons can get in contact and discuss possible further cooperation.
The platform was created using technologies to enable an easy adding and adapting of items:
- Jekyll: A software used to create haptic webpages, without the needed to write all the HTML code manually. The different items can be written with Markdown syntax and then are transformed into the webpages. The operator of the platform must provide the different general structure of the webpages, but new ones can be created by writing Markdown files, which are easier to write then HTML.
- Liquid: This is a open-source template language, which can be used together with Jekyll and load dynamic content during the creation of static HTML pages.
- Pagination: It is a module for Jekyll, which handles the linking and easy traversing of the different items. This makes it easier to add new items and add them to the overview, so that they can be easily used.
- Algolia: It is a service that offers a search functionality to webpages. With it a webpage can be indexed and then used in a search on the webpage. To use this service, the operator must establish an account at Algolia and create a key.
- GitLab CI/CD: This technology is used to ease the updating the webpage. It is connected to the GitLab code repository that is used for the FAIRWork Innovation Shop and automatically builds it every time the repository is updated.
The FAIRWork Innovation Shop was created following a central organisation approach and therefore the items can be added to the innovation shop through the operator. But the content which is published is created by the people responsible for the item. To add items to the innovation shop, to possibilities exist:
- Model-based approach: A conceptual modelling tool is available, with which items can be created. In it the needed information is provided and the modelling tool then creates everything and adds the defined items to the innovation shop.
- Manual approach: Operator with the needed technical knowledge can also create the files needed to add the items manually in the project folder.
How these two approach can be used, is discussed in the section below.
Innovation Item Information
The following information can be provided for the Innovation Items:
- Owner: Name of the organisation which is responsible for the item.
- Owner Homepage: Link to the homepage of the owner.
- Name: Name of the innovation item, that is shown in the item overview of the innovation shop
- Longtitle: Long title of the innovation item, that is shown on the item’s page.
- Abstract (optional): A short description of the item, which is shown at the item overview.
- Description (optional): Introduction to the item, which is shown on the top of the item’s page.
- TRL: The Technology Readiness Level of the item.
- License (optional): The license under which the item is available.
- Contact person: A concrete person from the owner, which can be contact regarding the innovation item.
- Contact person (email): The E-mail address of the contact person.
- Contact point: This attribute can be used to provide an additional point of contact for the item. This is only used for items with TRL 9 or higher.
- Access credentials: Additional information about credentials regarding the item can be provided. This is only used for items with TRL 9 or higher.
- Logo (optional): A path to the logo (in a picture format) of the innovation item.
- Logo Owner (optional): Logo of the owner organisation, can be provided as path to local picture or as a URL.
- Solution type: An enumeration field where a solution type can be chosen. The solution types are pre-defined and based on the needs from the FAIRWork project.
- Information (optional): Text providing general information about the item, which will be shown under the Information heading of the item’s page.
- Use (optional): Text explaining how the item can be used, which will be shown under the Use heading of the item’s page.
- Extend (optional): Text providing information on how the item can be extended by its users. The text is shown under the Extend heading of the item’s page.
Use
This section focuses on how the Innovation shop can be used, assuming that it is already installed. The usage of the platform will be explained from the perspective of users of the platform and from the perspective of the operators of the platform.
Innovation Shop Users
The natural entry point to the Innovation shop is its landing page, where users can find two opportunities to find items:
- Browse catalogue
- Search for solution
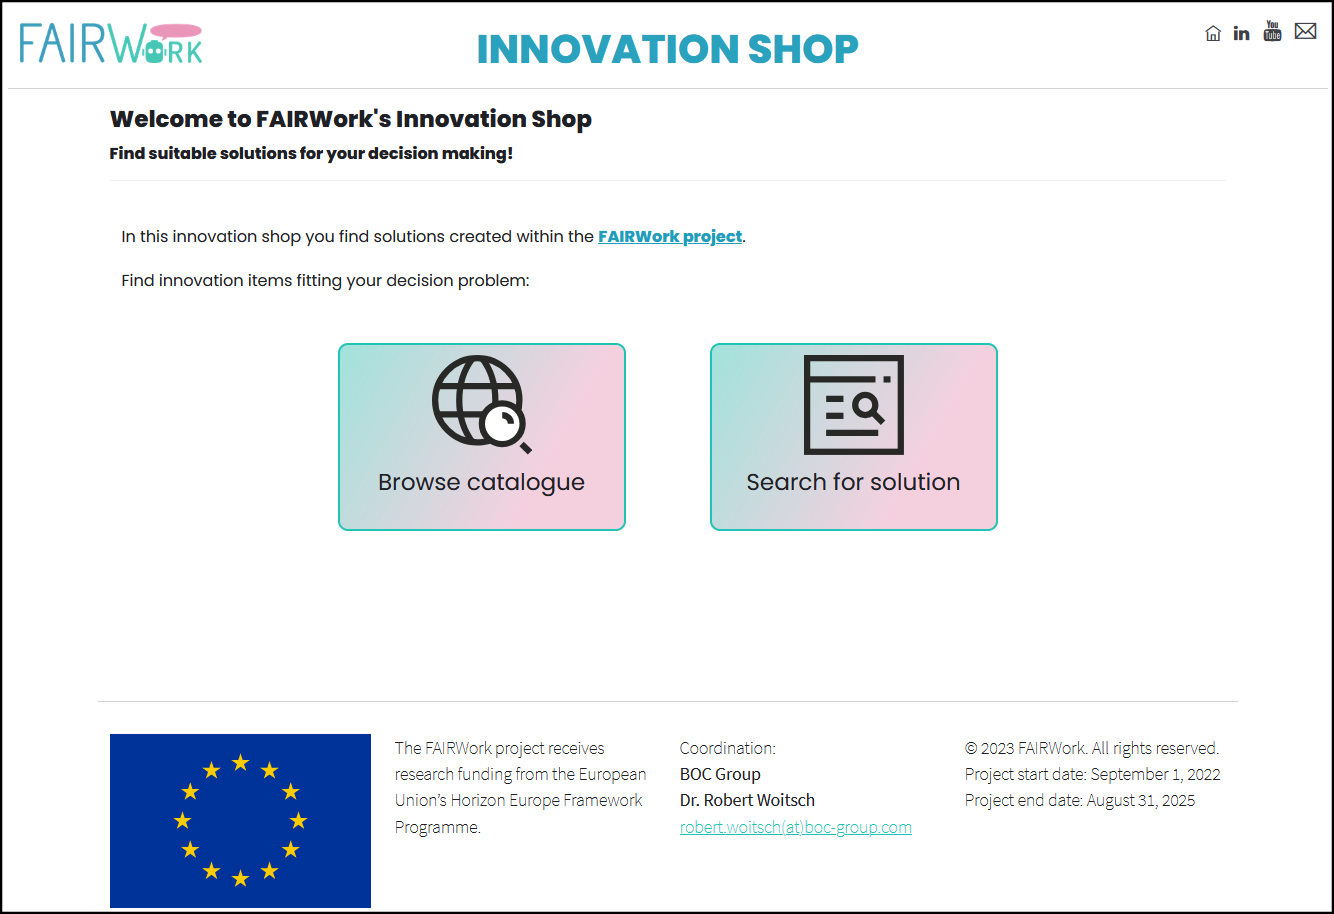
If Browse catalogue is chosen then an overview of the available innovation items is provided. How many items are shown per page is configurable through the operator. Per item, the following the following information is provided for a short overview:
- Name of the Innovation Item
- Logo (if available)
- Short description
- Responsible Organisation
- Contact person
- Type
- Technology Readiness Level (TRL)

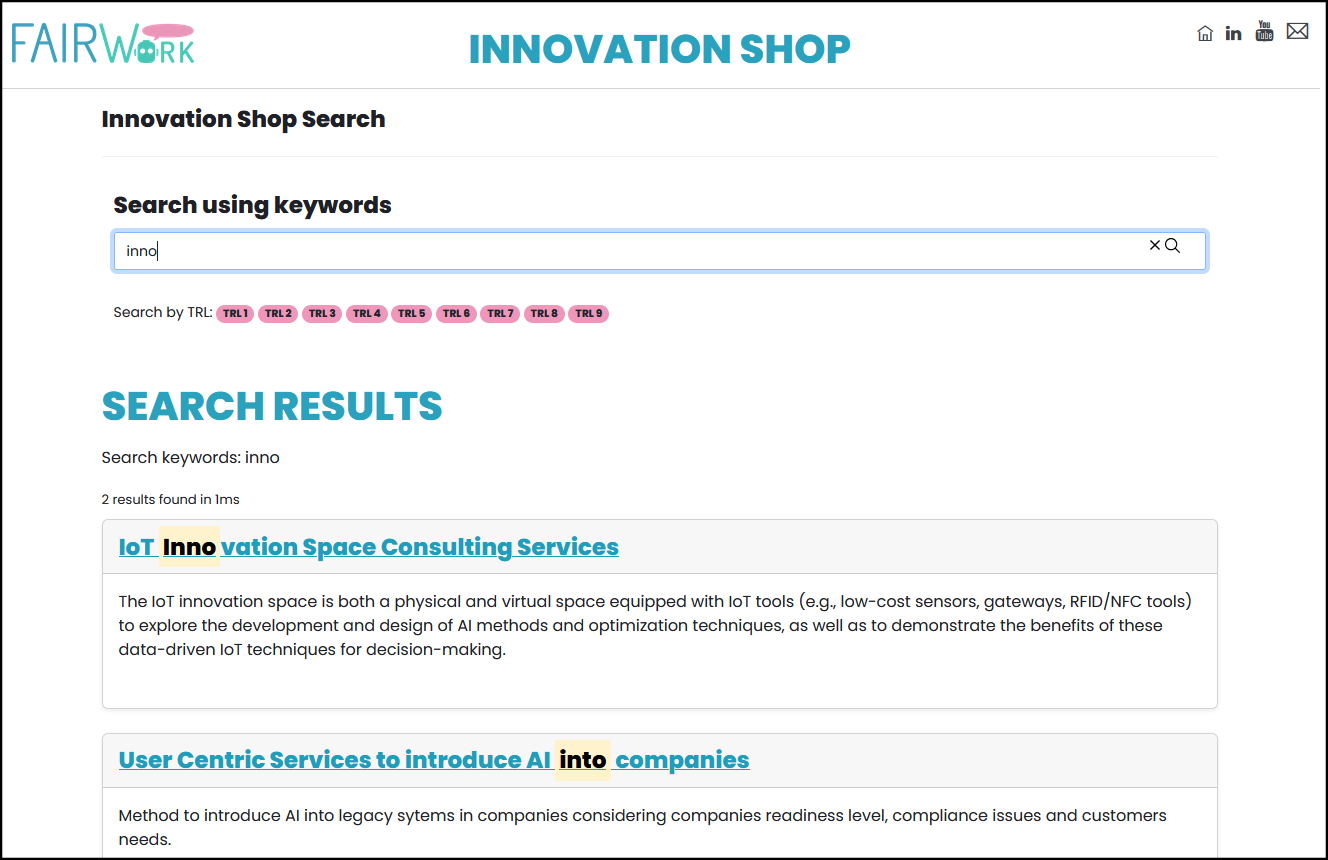
If Search for solution is chosen, then the search interface is shown, where the user can filter after TRL or provide keywords for the search. After filter or the search is applied, the fitting results are shown in a list.
Innovation Shop Operators
The Innovation Shop Operators are responsible for running and updating the innovation items in the platform. To create an adapt the innovation items, to possibilities are available.
- One is to create the innovation items manually, meaning that the markdown files, the additional content (like pictures) and the folder where they are contained are created manually by the user, including setting the paths correctly. This version allows offers more freedom, but also needs the user to have knowledge in Jekyll, Markdown and general creation of websites.
- A modelling tool is provided, with which the innovation items can be created and then published. It supports in defining the information needed to create the innovation items and offers an overview over the available items.
These two approaches are not compatible. You can create all the items with the modelling tool and then change them manually. But if you make changes in the model and then deploy the items again all manual changes will be overwritten. The modelling tool, can also import the items from a Innovation Shop and show them in a model. But it is only possible to read the items in the way, they were exported by the modelling tool in the first place.
More details on how the innovation shop can be installed and deployed can be found below in the Install & Deploy section. This includes the configuration that must be made and how the environment can be set-up to allow for an efficient working.
The description blow focuses on how innovation items can be created with the modelling method, as for doing it manually, it is assumed that the user is knowledge able and knows what to do.
Local Testing
To check how the innovation item looks like and if everything was created correctly, the webpage can be deployed locally, assumed to have installed everything locally. You can start the local test deployment by:
- Opening the local project in the terminal
- Execute
bundle exec jekyll serve - After a short time the webpage is available under
http://localhost:4000/
Creating Innovation Items with the Modelling Tool
The modelling tool for creating the innovation items can be found as its own innovation item.
Requirement: Before the modelled information can be deployed, the Git repository with the innovation shop must be locally available.
To create innovation item with the modelling tool, the modelling tool must be opened and afterwards a model must be created:
- Click
Model - Click
New - In the opened window:
- Select
Innovation shop model - Enter a
Name - Select a
Model group
- Select
- A new model should be shown
- Click on the
Innovation itemin the modelling bar and create a new object in the model - with a double click on the new item to open the notebook and fill in all the information
- repeat till all innovation items are available
- Click on the
If an Innovation item should be exported to the innovation shop, the Status (in the notebook) must be set to Ready for deployment. This status must always be set manually and if after it is deployed the status stays on Ready for deployment until it is manually set. If a item is deployed which already exist, then it is overwritten. To get an easier overview on the statuses of the items, one can use Innovation shop –> Toggle status. This either shows or hides small circles next to the innovation item to show the status:
- white: Initial
- red: Draft
- orange: Ready for deployment
- green: Deployed
- gray: Decomissioned
To deploy the items through the modelling tool:
- All items with the status Ready for deployment will be deployed
- Click
Innovation shop - Click
Deploy innovation items - Search for the folder with the local Git repository
- If no error is shown, then the items are deployed locally
To make the items available over the internet the changes must be pushed to Git repository where it is automatically build an published. To do so, open the terminal in the local folder of the innovation shop and enter the following commands, assuming that all made changes should be made publicly available:
git add *git commit -m "add/change item X and Y"(the text between the quotation marks should ba adapted to fit the the made changes)git push
Extend
Extending the Innovation Shop in this context does not mean to add or change innovation items, but to extend the platform itself. Therefore, adding new pages, new functionality or adapting the existing visualisation, like the used colours or the item overview. How the general information, specific to the project can be changed, is described in the Install & Deploy section below.
The sources of the FAIRWork Innovation Shop can be found in its GitLab Repository: https://code.omilab.org/research-projects/fairwork/innovation-shop-source
This section focuses on how the Innovation Shop itself can be adapted and therefore, it explains the structure of the project and where to find parts to start with extensions. But before the information is provided, it should be mentioned that extending the innovation shop requires knowledge HTML, Liquid templates, JavaScript and Jekyll. The technologies are not described here, as this would go beyond the scope of this item.
The important folders in the project are:
- _includes: This folder contains .html files with code snippets that are used in multiple places within the innovation shop. For example, the footer or header which is used in each page.
- _item: This folder contains .md files used to create the items. These files can be generated from the modelling tool
- _layouts: This folder contains .html files which are used to create the different webpages used for the platform. Here HTML code can be written, Liquid expressions and be defined and snippets from the _includes folder can be added.
- _pages: This folder contains .md files for the pages that should be created, based on the defined layouts.
By changing or adding files in these folder the Innovation Shop can be adapted. If functionality should be added, JavaScript can be added to the layouts or includes. If changes to the structure of the item pages or the item overview is made, they are applied to all existing items, once the innovation shop is newly build.
The style definition can be found in the folder ./assets/css/. Whereby, the main style definitions are can be found in style.css. To change the main colours used in the webpage, the three variables in the beginning of style.css must be changed:
- –color-fairwork-green
- –color-fairwork-turquoise
- –color-fairwork-pink
Install & Deploy
This section describes how you can install and deploy the innovation shop. It defines the proposed infrastructure and how to use it.
Requirements
The following requirements must be fulfilled to install, deploy and use the innovation shop as proposed. At it heart the Jekyll project creates HTML pages that can be deployed in multiple ways. Here we describe how we used in in the FAIRWork project.
Technical:
- Git Repository: The project sources should be saved in a git repository, which is able to use Continuous Integration and Continuous Delivery (CI/CD).
- Tested with GitLab v17.1.
- Server: A server is needed, fulfilling the following requirements:
- Linux-based operating System (e.g., Ubuntu)
- HTTP Server:
- Tested with the Apache HTTP Server
- HTTPS encryption enabled
- Port 443 publicly available
- Docker for building a container for the webpage
- GitLab runner connected to the Git repository, creating the Docker image and container
- Development Device: A device where the items can be created and then pushed to the Git Repository, where the webpage is automatically build and deployed. It must run the following software:
- Git: to push the page and items to the server
- (Optional) Ruby and RubyGems: This is needed to run the innovation shop locally for testing and debug purposes
- (Optional) Innovation Shop Modelling Tool: This optional tool can be used to create the innovation items available in the innovation shop.
- Algolia Account: Algolia is used for the search functionality. To use it one must be create an account and an API key
Knowledge:
- Git
- Markdown
It is assumed that the server and the network are set up and prepared by experts from the organisation who want to use the innovation shop.
Configuration
This section focuses on the configuration that must/can be made in the source of the innovation shop, so that it can be used in other contexts.
The main configuration of the innovation shop is done through the _config.yml file, where the following changes can be made, also by non experts:
- title: Define the title of the Innovation Shop, which is shown in the tab of the browser
- header_title: Text shown in the header of each page
- email: used for the link behind the e-mail symbol in the header
- youtube: used for the YouTube link in the header
- linkedin: used for the LinkedIn link in the header
- google_analytics: Add here your Google Tag ID, with which the traffic website traffic should be recorded and analysed.
- algolia: enter the information about your Algolia configuration, from your Algolia account.
Here is a list on how to change certain aspect of the innovation shop:
- Innovation Item overview:
- Shown per page: You can change the number items which are shown on the overview page, by opening the
_pages/innovationItemsOverview.mdfile and changing theper_pageparameter
- Shown per page: You can change the number items which are shown on the overview page, by opening the
- Logo:
- Replace the file
/assets/imgs/Logo_header.pngwith your own logo
- Replace the file
- Footer:
- The footer for all pages can be adapted by changing the
/_includes/include_footer.htmlfile
- The footer for all pages can be adapted by changing the
Install
Installing in this context means that the project is prepared locally for testing and debugging.
To use locally one must install Ruby and RubyGems on the local device
- Information on how to install Ruby can be found here: https://www.ruby-lang.org/en/downloads/
- Information on how to install RubyGems can be found here: https://rubygems.org/pages/download?locale=en
You can download the Git repository, if you have installed an Git on the device and opened the terminal in the folder, where the project should be saved locally. Then execute the following command in the:
git clone %project-url%(where %project-url% must be replaced by the url of the Git repository)
After the the project is saved locally, execute the following commands:
bundle installbundle exec jekyll serve
The first commands installs everything is needed and with the second command starts a local server, with which the Innovation Shop can be accessed, by opening http://localhost:4000/ in the browser on the same machine.
The same local project can then be used to push it to remote Git repository, where it is automatically deployed.
Deploy
Deployment in this context means, that the project is build on the prepared server and is then publicly accessible. How this is exactly done depends on the concrete available infrastructure. The infrastructure explained in Requirements is how it is set up for FAIRWork.
To deploy changes to the Innovation Shop, the local project (containing the new version) must be pushed to the Git repository by executing the following commands in the command line.
git add *git commit -m "add/change item X and Y"(the text between the quotation marks should ba adapted to fit the the made changes)git push(This command will publish all local changes)
The steps that are executed to automatically deploy the project are saved in .gitlab-ci.yml. What the example does it only deploys the webpage new if it is the default branch (usually main). Then it builds the webpage new with the help of the Pages functionality, where the HTML pages are build with a docker image and then locally deployed on the server, so that it can forwarded through teh Apache server.